

The Pitches Viewer is a useful tool to assist you in transcribing music and for getting a view of how the various parts combine to make the song. It offers three levels of viewing pitch information:
- raw spectrogram form - this view shows the frequency content present in one or more of the tracks. For melodic instruments, you will see how a note on the instrument is distributed along the harmonic series. Percussive instruments will appear as "smears" along the vertical axis.
- pitches - this view shows the results of Song Master processing the raw spectrogram into a more useful form that highlights the probable notes being played.
- midi notes - the pitches layer is further processed and midi note values are generated. The midi notes can be saved to an external midi file or dragged into a DAW or midi editor for further processing.
These three levels can be computed from a stereo/mono audio track or from Song Master's generated stems and can be viewed in any combination.
Bottom Pitch Panel
The Pitch Panel is composed of three sub-panels. The first panel contains controls to generate, modify, and save the pitches to midi format. The second panel contains controls to display the three levels of pitch information for each track. The third panel contains available global options.
Let's look at the middle panel first.
Tracks sub-panel
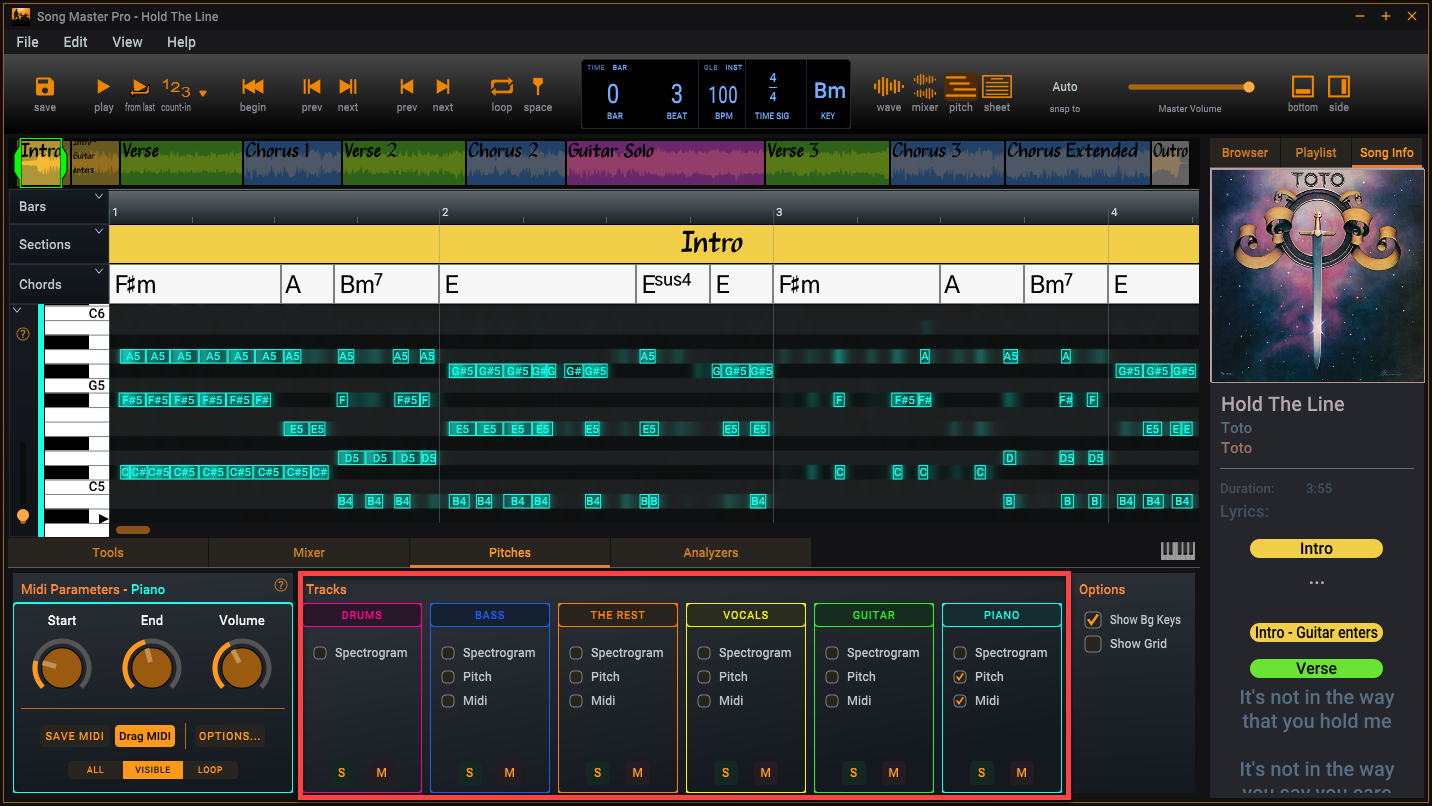
This panel determines what is displayed in the view area. Each audio track has a group of controls to display the three layers (except Drums which doesn't contain melodic information so it doesn't display Pitch and Midi layers) and controls to Solo and Mute the track.

In the above screenshot, we've enabled the Pitch and Midi layers for the keyboard track only. Note that the Midi layer displays the name of the note as well as showing its start and end times.
It is often useful to view both Pitch and Midi layers at the same time since the midi layer may filter out useful information that is available in the Pitch layer.
Pitches - ALL
If the song's audio contains just one instrument, the Pitches view displays a group similar to each track above, however, it adds an additional drop-down that is useful to select the instrument in the audio. For example, if the audio track contains only piano, then selecting Piano from the list will adjust the midi extraction parameters to use values more suitable to a piano. Select All if the audio contains many different instruments.

Midi Parameters sub-panel
To the left of the Tracks sub-panel is the Midi Parameters sub-panel. This sub-panel is used to manipulate the notes in the active Track's Midi layer.
Changing the Active Track
In the screenshot below, we first click on the Piano track header to activate it in the Midi Parameters panel (notice that the Midi Parameters panel displays the name of the active track at the top and uses the color of the track. We then click on the Guitar track to active it. Finally, we click on the Vocals track, however, since it isn't displaying its midi layer, we need to click on Midi before the Midi Parameters panel is enabled.

Midi Parameters Controls

The controls at the bottom of this panel all related to exporting midi which is discussed a bit later.
Scrolling and Zooming
All the options for scrolling and zooming in the Waveform view apply to the Pitches view. However, you also need to be able to zoom and scroll vertically as well as horizontally. There are numerous ways to scroll and zoom the pitch viewer:
- Scroll Time (horizontal) mouse-wheel
- Zoom Time (horizontal) with Shift + mouse-wheel
- Zoom vertically - Ctrl+shift + mouse-wheel
- Zoom vertically - use the slider at the very left of the Pitches view
- Scroll vertically- Shift + mouse-drag the piano
- Pan - Ctrl + Shift + left-mouse-drag
- Zoom into a region - Shift + mouse-drag to draw a rectangle over the region to zoom in on.
- Reset vertical zoom - double-click the zoom slider
Other Keys
- Alt + click in the view area to hear the note played on the built-in piano
- To create a loop, use Ctrl + mouse-drag to define the loop region
Side Bar
The area to the left of the Pitch view displays a keyboard showing the notes corresponding to each row of the Pitch view, a colored bar that corresponds to the range of the instrument played on the track, and a slider that controls the vertical zooming. The piano also functions as a vertical scrollbar when <shift> is held as the mouse is dragged up and down.

Pitches appear on Piano bar
The Pitch View uses the Piano Bar to display the notes at the current playhead. The notes on the Piano Bar are color coded using the color assigned by the instrument's label set.

Exporting Midi Data
The midi data for a track can be saved to an external file or drag-and-dropped into a DAW or midi editor. You also have the option to export a number of other track information as midi meta data. Click the Options... button to display a dialog and select the midi data that you want to have exported.

Note that not all DAWs will import the midi meta data selected from the Options dialog, you will need to consult you DAWs documentation (or just try and see what data it imports). However, some DAWs will give you an error if you try to import midi meta data that it doesn't allow.
Use SAVE MIDI button to save the data selected in the Options dialog as a midi file. You can drag-n-drop the selected midi data directly into a DAW by initiating the drag operation from the Drag MIDI button.
When exporting midi data to a DAW, you will usually want to export the Tempo Map first. Importing the Tempo Map is crucial to getting the data from Song Master Pro to align with the bars in the DAW.
Some DAWs will only import a tempo map if it is imported as a Midi File and a new project is created.
The three radio buttons at the bottom are used to set the time range of he midi data to export. Selecting All will export all midi, Visible will only export the notes that are visible, and Loop will export only the notes in the active loop.
Options panel
The controls in this panel are used to show/hide the "keys" displayed as a background of the viewer, and to show/hide a grid overlay.

Caching
To improve performance when viewing midi data, the data is cached so when the song is loaded again, the results are readily available. You can manage the data (i.e. delete it to free up storage space) by going to the Settings dialog and clicking the Cache folder View… button. If you delete the cache data for a song, the next time Song Master Pro needs to display it, it will re-compute the midi notes.